Nginx. Issuing an SSL certificate
The BeAdmin panel can issue free Let's Encrypt SSL certificates for Nginx virtual hosts and keeps them up to date on its own. Working with the certificate differs depending on the virtual host mode — builder or expert; this article covers both scenarios, as well as manual issuance and reissuance.
Creating a virtual host in builder mode
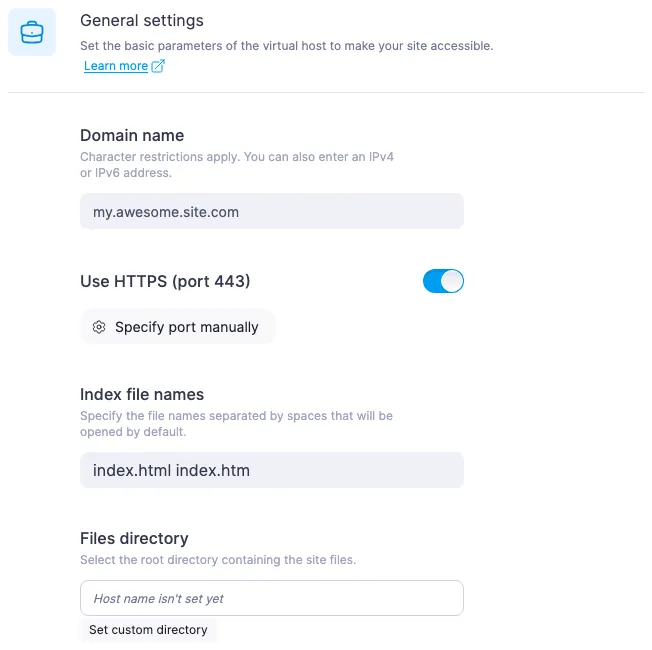
In builder mode the panel issues the certificate automatically when the virtual host is created, provided the «Use HTTPS (port 443)» toggle is on in the form. In that case the certificate is requested as part of the creation flow. If you choose HTTP (port 80) or specify any other port manually, no certificate is requested.
If certificate issuance fails, the host is still created and runs with a self-signed certificate. The panel reports the error in a detailed notification in the top-right corner of the screen — specific messages and what to do about them are covered in Resolving ACME errors when issuing an SSL certificate.
Creating a virtual host in expert mode
In expert mode the certificate is not issued automatically, even if the config contains a listen 443 ssl line. To obtain a certificate, you have to press the issue button separately after saving the host (see the next section).
When the editor in the creation form is opened for the first time, the field is pre-filled with a starter template containing two server blocks — HTTP on 80 and HTTPS on 443. For manual issuance to work, three fragments must remain intact in the template:
- A
serverblock on port 80 with the correctserver_name. Let's Encrypt verifies domain ownership over HTTP-01, and the validation request arrives on port 80 specifically. - Inside the port-80 block —
location /.well-known/acme-challenge { proxy_pass http://127.0.0.1:5180; ... }marked with# DO NOT REMOVE — required for Let's Encrypt issuance via "Renew SSL". Let's Encrypt validation requests go through it. - In the port-443 block —
ssl_certificate /etc/ssl/beadmin/<server_name>/<server_name>.crtand a matchingssl_certificate_key, marked with# DO NOT CHANGE — the panel writes the issued cert to these paths. The panel saves the issued certificate to these paths.
If you are writing the config from scratch or have removed any of these fragments — put them back, otherwise manual issuance will fail with an error.
⚠️ Custom certificate paths in expert mode
The issued certificate is always saved to fixed paths — /etc/ssl/beadmin/<server_name>/<server_name>.crt and the matching .key. The host config is not parsed during issuance, and the paths from the ssl_certificate and ssl_certificate_key directives are not taken into account.
If those directives in your config point somewhere else, issuance will complete with no visible errors: the button reports success, a new certificate appears in the database, and the file lands at the standard BeAdmin path — but Nginx will read the certificate from the path you specified and keep serving the old one, so from the outside it will look as if nothing changed. To make the new certificate actually take effect, either restore the default paths from the starter template in ssl_certificate*, or, after each issuance, manually copy the certificate from the BeAdmin path to yours and reload Nginx.
How to issue or reissue a certificate manually
You can trigger issuance or reissuance from two places:
- In the sidebar of the Nginx module — using the arrow icon to the right of the host name. On desktop it appears only on hover over the row.
- In the «Sites and domains» section — the same icon next to the host; the issue date and expiry of the current certificate are also visible here.

Both buttons do the same thing. There is no confirmation dialog: issuance starts as soon as you press. Hovering over the button shows a tooltip with the current action — «Issue certificate» if no certificate has been issued yet, and «Reissue certificate» when one is already in place. After a successful issuance or reissuance the panel reloads the Nginx configuration on its own, and the site immediately starts serving the new certificate.
In builder mode the button works only for hosts on port 443 — for the rest, hovering shows the tooltip «Requires port 443 (HTTPS)». In expert mode the button is active for any config. While issuance is in progress, the icon shows a loading indicator.
Let's Encrypt rate limit
Each press of the issue button is a separate request to Let's Encrypt, and Let's Encrypt enforces a combined limit per domain and all its subdomains. Several presses in a row will quickly hit that limit: the panel will show the error «Too many SSL certificate requests» — issuance becomes temporarily unavailable.
Wait for the outcome and do not press the button again until you have figured out what went wrong last time.
What happens to the certificate when modes are switched
The certificate is preserved when switching between builder and expert mode in either direction. The switch dialog says nothing about the certificate, and that is normal: nothing happens to it.
The original config is also not lost when switching from expert back to builder — you can return to it by switching once more. After the switch back, builder mode shows the last set of fields you saved there.
What can go wrong
After an issuance attempt the host is still on a self-signed certificate
Most likely the previous attempt failed with an error. Press «Reissue certificate» and read the message — specific wordings are broken down in Resolving ACME errors when issuing an SSL certificate.
After issuance or reissuance the browser still shows the old certificate
The panel reports success, but the browser still warns about an insecure connection (after the first issuance) or shows the previous dates on the certificate (after a reissuance). You can check with openssl s_client -connect <your-domain>:443 </dev/null 2>/dev/null | openssl x509 -noout -dates — if notBefore has not updated, the new certificate is already on disk but Nginx is still using the old one. Open the Nginx module in the panel and press «Reload configuration» — after that the site will serve the up-to-date certificate.
Expert mode: the certificate "was issued", but Nginx serves the old one
Most likely the ssl_certificate and ssl_certificate_key directives in your config point to a path other than the standard BeAdmin one — Nginx reads the certificate from there and does not see the new one. There are two fixes: either restore the default paths from the starter template in ssl_certificate*, or, after each issuance, manually copy the certificate from the standard path to yours and reload Nginx. The same scenario is covered in more detail in the warning about custom paths above.
Useful links
- Resolving ACME errors when issuing an SSL certificate — a breakdown of specific Let's Encrypt error messages.
- Nginx. Virtual hosts in expert mode — the starter template, switching between modes, wiring up PHP-FPM by hand.
- Nginx. Working with virtual hosts — creating and editing a host in builder mode.