Proven over 15 years in hosting. Your VPS with BeAdmin is ready to go out of the box.
 Germany
 Netherlands
 Sweden
 Switzerland
 Spain
Spain USA
USA
Multi-hop mode links two independent BeAdmin installs into an entry → exit chain. Traffic goes device → entry hop → exit hop → internet: the device connects to the first server, but reaches the internet from the second. Multi-hop is a fit when a single Xray server stops working — its REALITY handshake is already recognized by DPI, or its IP has become unreachable.
This article covers why you'd want a chain and how to assemble one from two servers: create the exit hop, link an entry hop to it, and check that the chain works. If you're just getting to know the module, start with Xray quick start; how the traffic masking works is in Xray. How the service works.
With a regular Xray user, traffic reaches the internet from your server's IP, and the provider sees a connection to that same server. As long as the server stays off the radar, that's enough. But if its REALITY handshake is already recognized by DPI, or its IP has become unreachable, you need a different egress address.
A chain splits apart the two points the server is visible from on the outside:
Even if the entry hop becomes unreachable, the egress address stays out of the way — and vice versa. This is not Tor-grade anonymization: the chain adds exactly one intermediate hop to change the egress IP, no more.
BeAdmin servers in different locations — otherwise a chain makes no sense: its whole job is to spread the entry and the exit across different networks. The Xray module must be installed on each server. Let's call them install A (the future entry) and install B (the future exit).If you haven't picked the servers for the entry and exit hops yet, our partners offer a VPS with BeAdmin already installed — in a choice of several countries: take the entry close to the user, and the exit in the location you need.
Proven over 15 years in hosting. Your VPS with BeAdmin is ready to go out of the box.
GermanyNetherlandsSwedenSwitzerlandSpainUSAEuropean reliability made simple. Launch BeAdmin with your VPS in just one click.
GermanyNetherlandsSweden Estonia
 RomaniaSwitzerlandSpain
'%3e%3cpath%20fill='%2300008b'%20d='M0%200h384v256H0z'/%3e%3cpath%20stroke='%23fff'%20stroke-width='42'%20d='m1.914-.001%20382.086%20256m-382.086%200L384-.001'/%3e%3cpath%20stroke='red'%20stroke-width='14'%20d='M5.437%200%20192%20122M378.563%200%20192%20122M5.437%20256%20192%20134m186.563%20122L192%20134'/%3e%3cpath%20fill='%23fff'%20d='M157.787-.001h68.359v256h-68.359z'/%3e%3cpath%20fill='%23fff'%20d='M-.067%2093.999H384v68H-.067z'/%3e%3cpath%20fill='red'%20d='M384%20107.789H211.862V-.001h-39.724l.001%20107.79H0v40.419h172.139v107.79h39.723v-107.79H384z'/%3e%3c/g%3e%3c/svg%3e) United KingdomUSA
United KingdomUSAℹ️ The role belongs to a user, not a server
Multi-hop mode is the role of a particular user, not a mode of the whole install. Standalone users, entry hops, and exit hops happily share one server. A single install can be the entry for some users and the exit for others at the same time — that is, work in both directions.
ℹ️ A chain needs two users
A chain is built from two users: an exit hop on one server and an entry hop on the other. Each one takes up a slot in its server's licence. If you need more than one multi-hop connection, you'll have to purchase a licence on both servers.
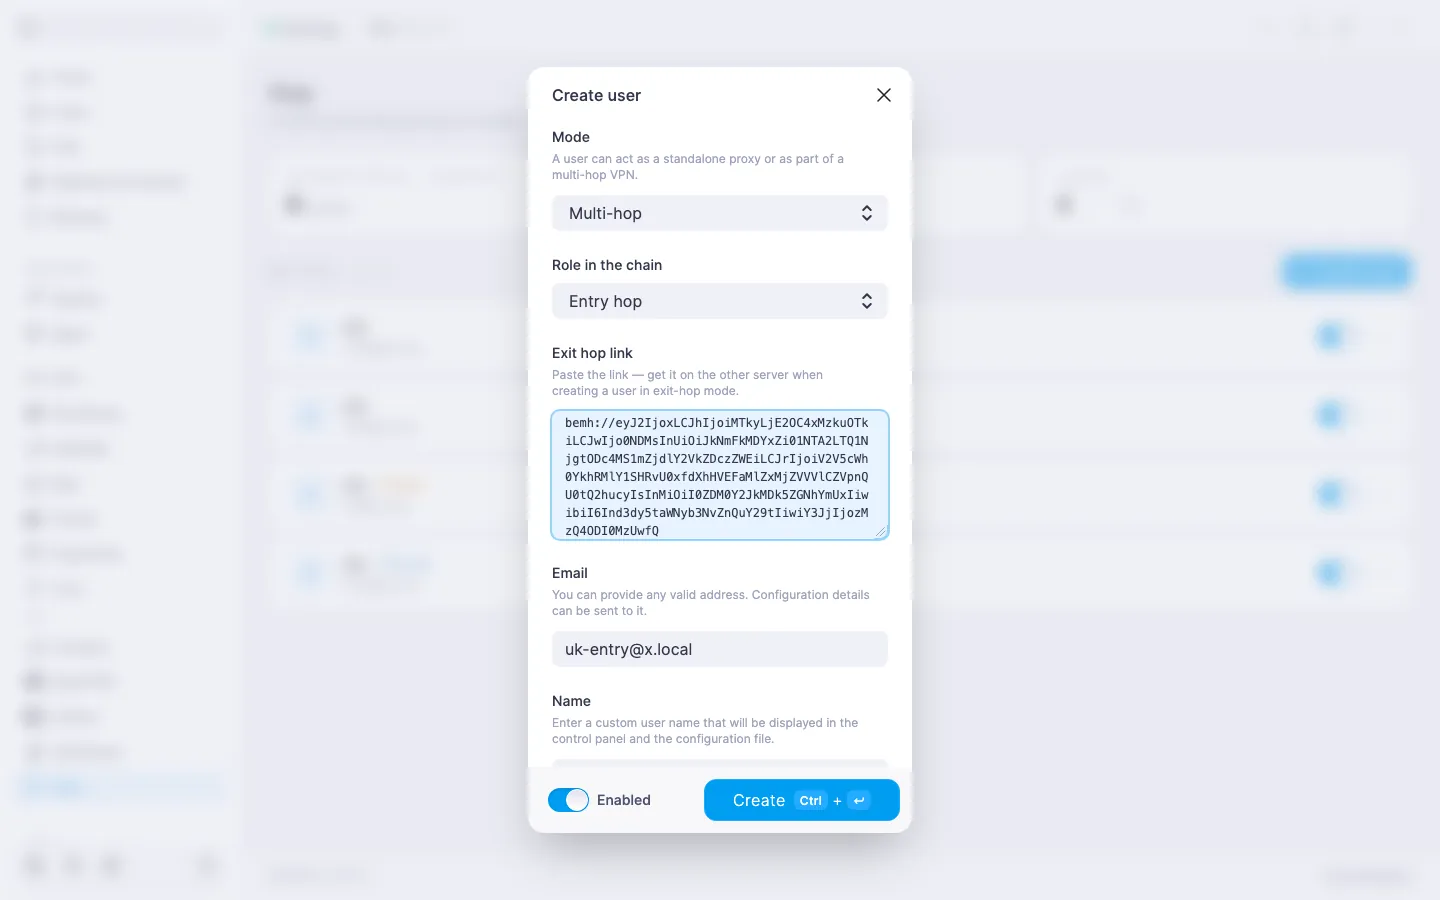
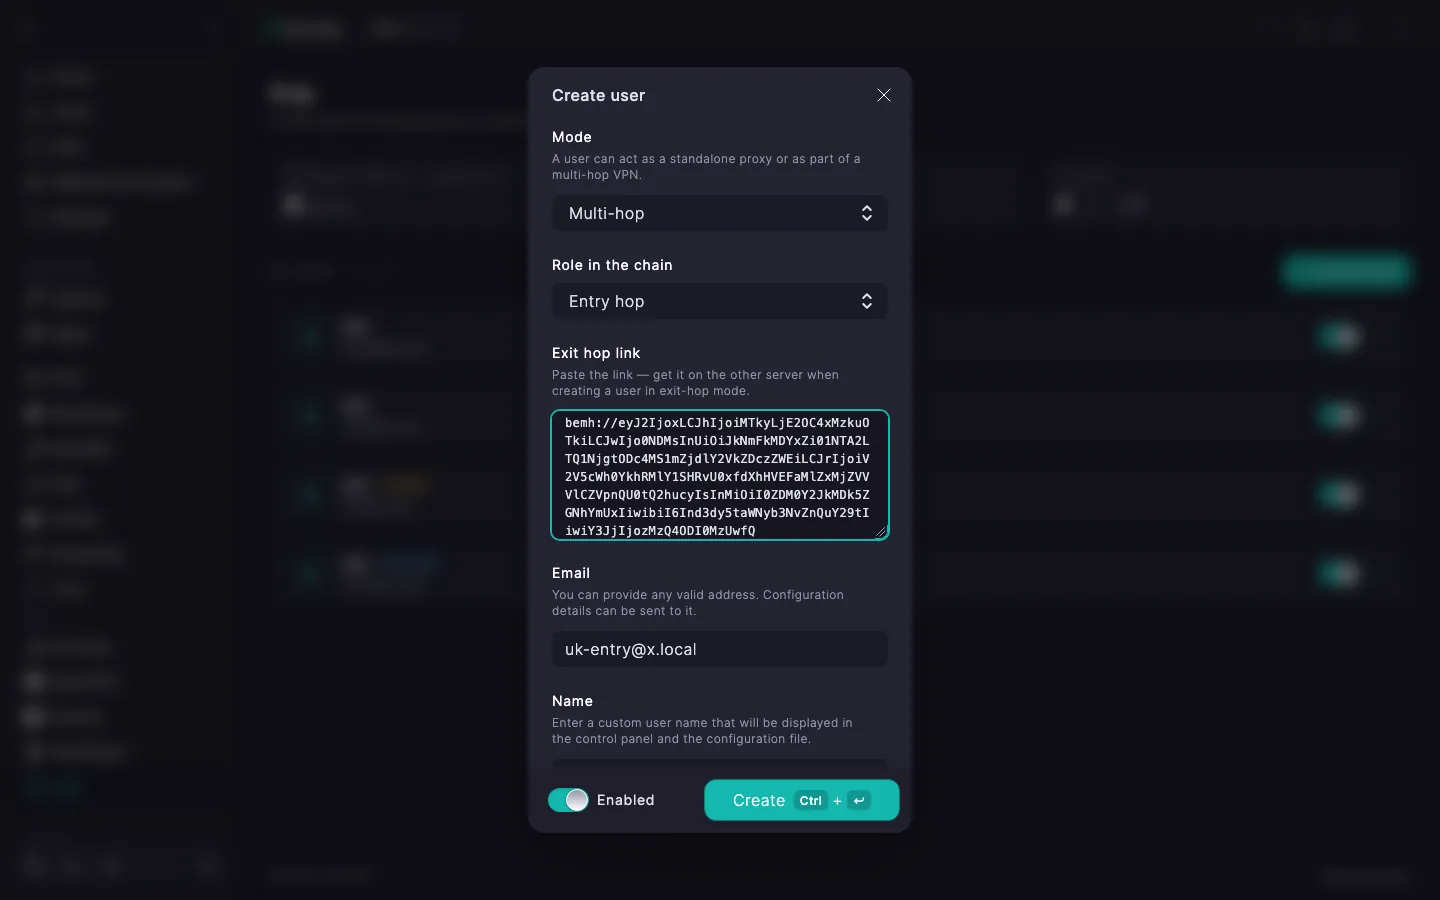
There's no shared management between the two panels — they don't know about each other. The link is one-way and assembled by hand: the exit hop issues a special bemh://… link, and you copy it and paste it into the entry hop on the other server. Order matters — exit first, then entry.
bemh://…. It encodes the connection parameters of this exit hop. Pass it to install A any way that's convenient.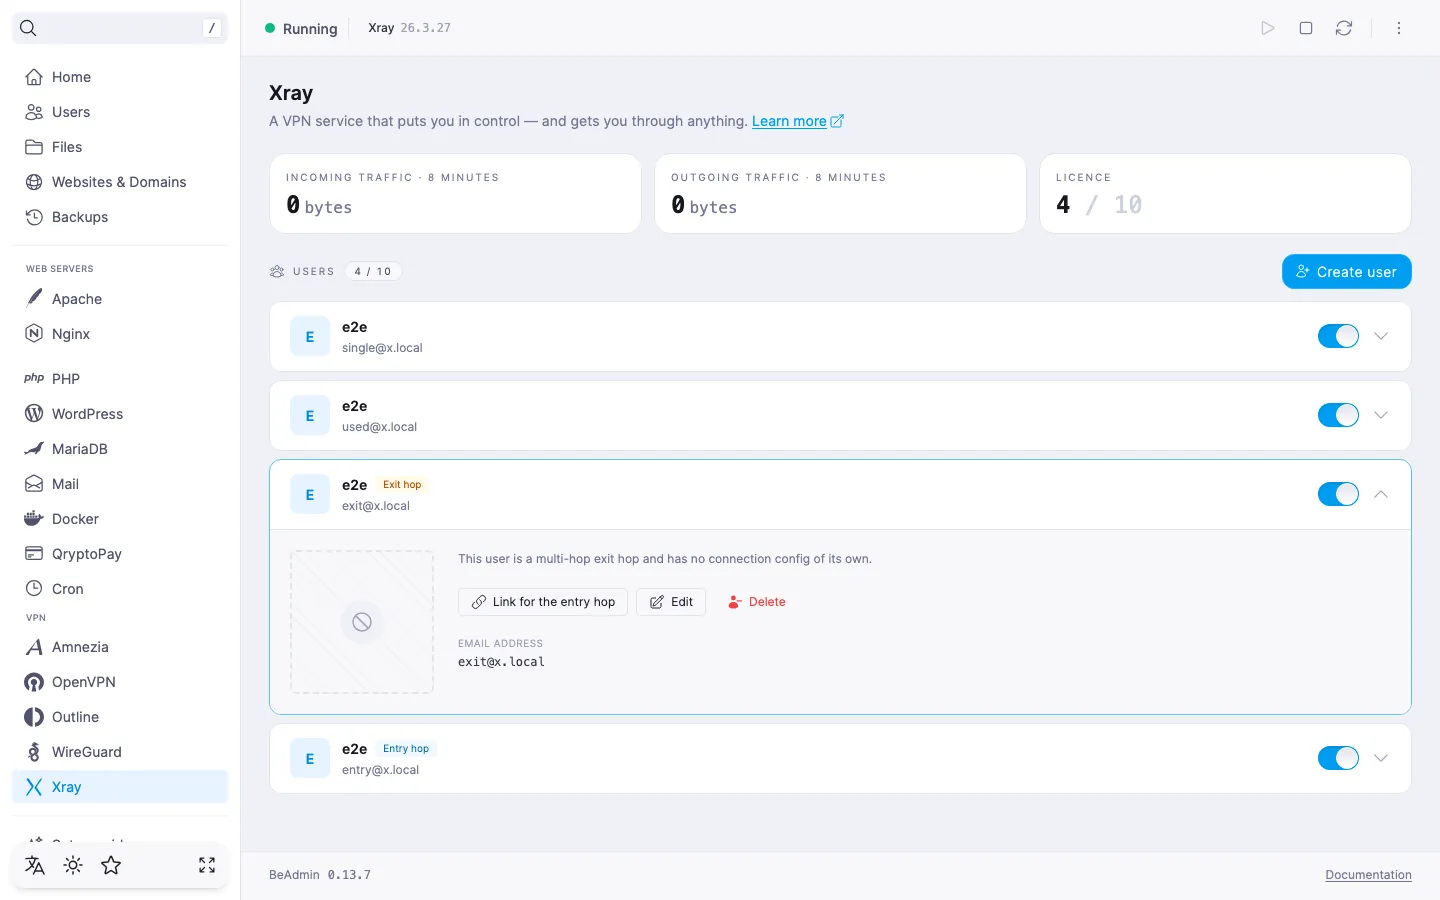
bemh://… link you copied in step 1 here.The exit-hop link can be pasted either at creation time or later — the Edit dialog of an existing entry hop has the same field.
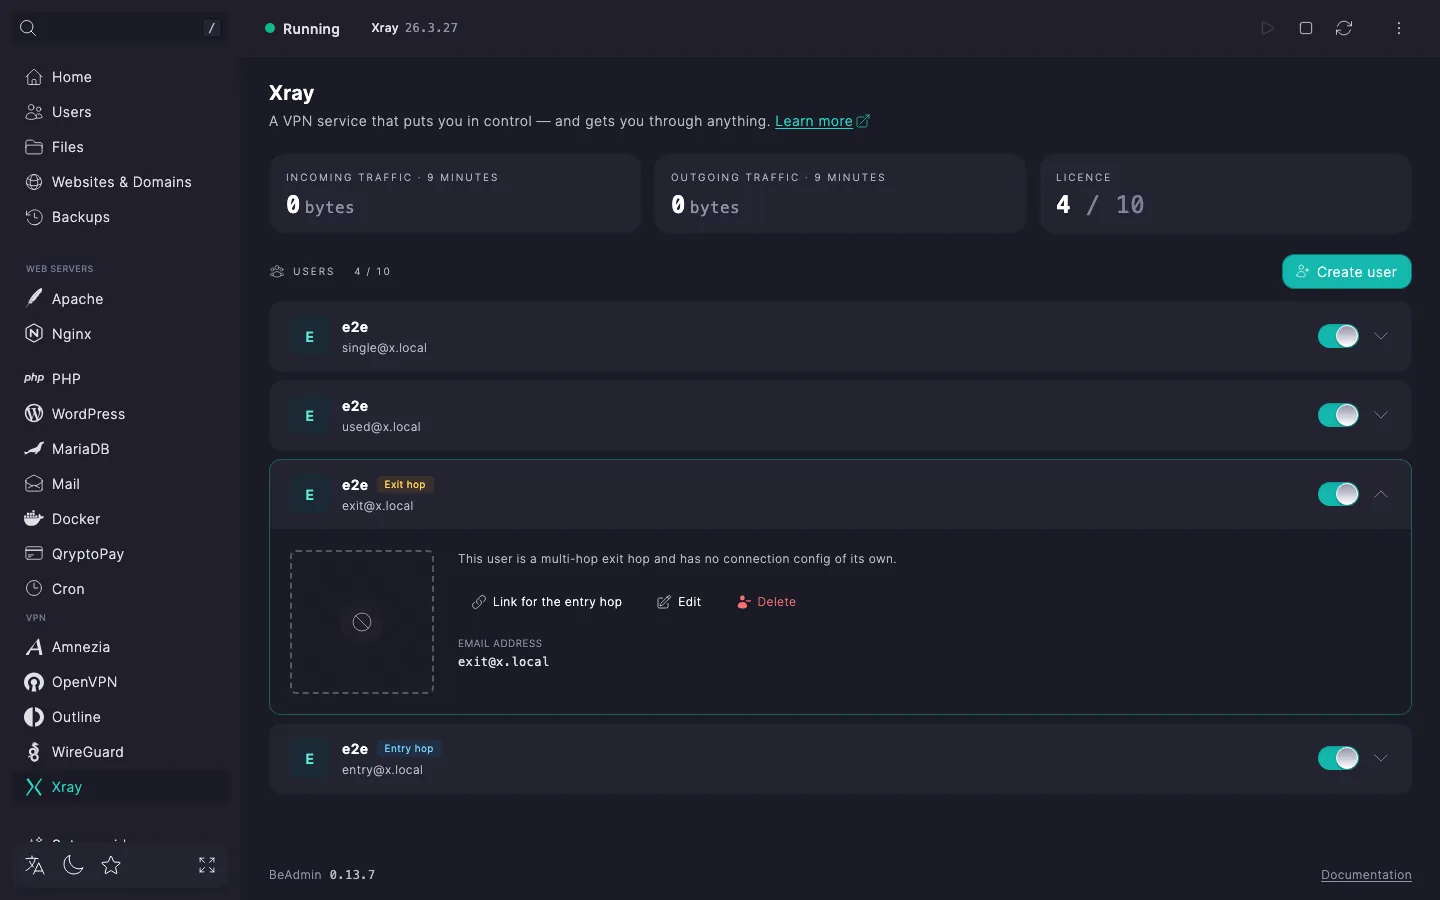
The entry hop is a full-fledged user with its own vless://… link and QR code. Those are what you hand to the end device, just like with a regular user (see Xray. Managing users). From there the traffic travels the chain on its own.
The entry hop's expanded row gains a Multi-hop status tile — it shows whether the entry reaches its exit. Next to it, once the link is set up, a tile with the exit hop's address appears.
| Status | What it means and what to do |
|---|---|
| Active | The link is up, the exit hop is reachable — the chain is working. |
| Checking… | The panel is polling the exit hop right now. Wait — the status will update on its own. |
| Exit not bound | The exit-hop link hasn't been pasted yet. Open the entry hop for editing and paste the bemh://… link (step 2). |
| Exit unreachable | The exit hop isn't responding. Check that the Xray service is running on install B, the server is on and reachable over the network, and the exit's address and port haven't changed. |
| Version mismatch | The Xray version on the exit hop is below the minimum the link requires. Update the Xray module on install B (see Xray. Managing the module) and generate the link for the entry hop again. |
The entry hop's link to its exit can be changed at any time:
bemh://… link on the exit hop you want and paste it into the entry hop's Exit hop link field — the previous link is replaced with the new one.To release traffic from a different location, set up a new exit hop and rebind the entry to it:
BeAdmin on it, and bind a licence — it's a standalone install, just like the first.vless://… link.